Friday 29 September 2017

Santa overload!

Hello lovely people,

It's Friday (woohoo!) so it's time for me to show off some gorgeous goodies from Dies to Die For.

I was so excited to play with my new Tiny Santa Agenda from Mama Elephant that I couldn't stop making cards with them so I have 3 cards to share!

For my first card I have Santa standing on a triple stacked die cut word.


I used the same Authentique paper pad for my second card and this sentiment is included with the Santas.

I added some sparkle to the images because Santa loves a bit of bling!


Finally, I used a Blueprints set from MFT to create this layered design, and this is a different paper pad from Carta Bella.


If I've tempted you with any of the lovely supplies I've used then you can go straight to the individual products via the links at the end of my post or just pop over to Dies to Die For and have a little browse around!

Thanks for visiting and I really appreciate any comments that you leave,


Copic colours;
Skin: E000, E00, E21, E11
Clothing: R24, R46, R39
Beard: W00, N0, N1, N2
White trim on clothes: N0, N2
Boots: N5, N7
Sack: E33, E35, E37
Presents: B14, YG17, R46

Lovely things I've used from Dies to Die For;
Little Santa agenda stanps - Mama Elephant
Little Santa agenda dies - Mama Elephant
Inside and out stitched rounded square STAX - My Favorite Things
Stitched mini scallop circle STAX - My Favorite Things 
Blueprints 13 by My Favorite Things 
Scripty Merry - Lawn Fawn

Other ingredients;
Bundle 6x6 paper pad - Authentique
So this is Christmas 6x6 paper pad - Carta Bella
Crustal Glamour Dust
Twine, Kraft card - from stash

Friday 22 September 2017

Garden fairy

Hello lovely people,

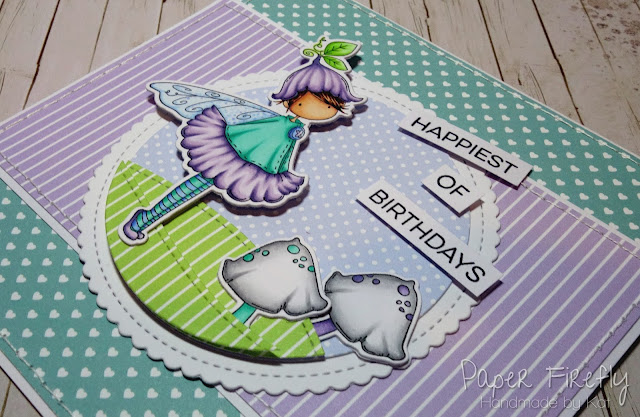
I am running a little bit late with my Dies to Die For DT card today but I think this gorgeous little fairy might be worth the wait!

Birthday card using Tiny Townie Fairy Garden Fairy by Stamping Bella

I couldn't resist creating a little layered scene for her and that meant I could include the darling little mushrooms too!

Birthday card using Tiny Townie Fairy Garden Fairy by Stamping Bella

If I've tempted you with any of the lovely supplies I've used then you can go straight to the individual products via the links at the end of my post or just pop over to Dies to Die For and have a little browse around!

Thanks for visiting and I really appreciate any comments that you leave,


Copic colours;
Skin: E000, E00, E21, E11, E04
Hair: E21, E25, E29
Skirt / hat: BV0000, BV000, BV11, BV34
Top / tights: BG11, BG 13, BG23
Wigs / tights: B21, B32, B23 (&BG0000 on wings)
Leaves: YG11, G21, YG25
Mushrooms: C00, N0, N1, N2, N3
Mushroom spots as for lilac/blue areas of fairy

Lovely things I've used from Dies to Die For;
Tiny Townie Fairy Garden Fairy stamp set - Stamping Bella
Tiny Townie Fairy Garden Fairy die set - Stamping Bella
Tiny hearts pastels 6x6 paper pad - My Favorite Things 
Itsy bitsy polka dots pastels 6x6 paper pad - My Favorite Things 
Proper pinstripes pastels 6x6 paper pad - My Favorite Things 
Stitched mini scallop circle STAX - My Favorite Things 
Stitched hillside borders - Lawn Fawn
More Essential Sentiments - My Favorite Things

Sunday 17 September 2017

Tiny mouse

Hello lovely people,

 We have a new 'Use any image' challenge starting over on The Ribbon Girl blog, so you can enter with any type of project as long as you include an image.
There are some lovely prizes on offer so I do hope you can come and join us :-)

Rustic card using Three Kind Mice stamp from LOTV

This is a pretty dinky image but oh so cute, and I had a feeling the little mouse would look lovely with these gorgeous floral papers from Maja Design.

Rustic card using Three Kind Mice stamp from LOTV

Since the image is small, so is my card, and I just added a few flowers, twine and a beautiful metal charm.

Rustic card using Three Kind Mice stamp from LOTV

If you find yourself tempted by any of the pretty supplies I've used then you can go straight to the individual products via the links at the end of my post or just pop over to The Ribbon Girl and have a little browse around!

Thanks for visiting and I really appreciate any comments that you leave,


Copic colours;
Not a clue as I coloured this a while ago - lol!

Lovely things I've used from The Ribbon Girl;
Denim and Friends 6x6 paper pad - Maja Design
Ivory button twine
10mm ivory open roses
10mm blue open rose
Miniature pale blue blossoms
Miniature ivory cream blossoms
Daisy flower charm

Other card ingredients;
Three Kind Mice digital stamps set - LOTV
Inside and out stitched circle STAX - My Favorite Things
Stitched mini scallop circle STAX - My Favorite Things
Fab foliage - My Favorite Things

Friday 15 September 2017

Warm wishes reindeer

Hello lovely people,

I have a Dies to Die For DT card for you today and I was desperate to use the Mama Elephant reindeer, which are not new but I have only just got them!

I really am enjoying more CAS cards lately...

Sweet and simple Christmas card using Reindeer Games  stamps by Mama Elephant

This sentiment set is my absolute favourite this year and I can't seem to stop using it!

This was a pretty quick make for me...just don't ask how long it took me to place those sequins...and I still don't know if I'm happy with them - lol!

Sweet and simple Christmas card using Reindeer Games  stamps by Mama Elephant

If I've tempted you with any of the lovely supplies I've used then you can go straight to the individual products via the links at the end of my post or just pop over to Dies to Die For and have a little browse around!

The brand new Mama Elephant release has just been added to the website so that's a good place to start your browsing...I treated myself to a couple of items ;-P

Thanks for visiting and I really appreciate any comments that you leave,


Copic colours;
Reindeer: E53, E23, E33, E25
Antlers / lower face: E51, E53, E23
Nose / hooves: E25

Lovely things I've used from Dies to Die For;
Reindeer Games stamps - Mama Elephant
Reindeer Games dies - Mama Elephant
Jingle Greetings - Mama Elephant
Perfectly Plaid Winter 6x6 pad - Lawn Fawn
Stitched basic edges - My Favorite Things
Blueprints 29 - My Favorite Things
Mermaid Tail sequin mix - Neat and Tangled
Starry Night sequin mix - Neat and Tangled

Friday 8 September 2017

Big wreath, little wreath...

Hello lovely people,

It's Friday which means that my week of holibobs is almost over and also that it's time for me to share my Dies to Die For DT card...actually it's TWO cards today!

Every year I say I really don't need any new Christmas stuff but every year I am tempted into buying new stash, and my resolve was totally broken this year by the gorgeous Lawn Fawn release.

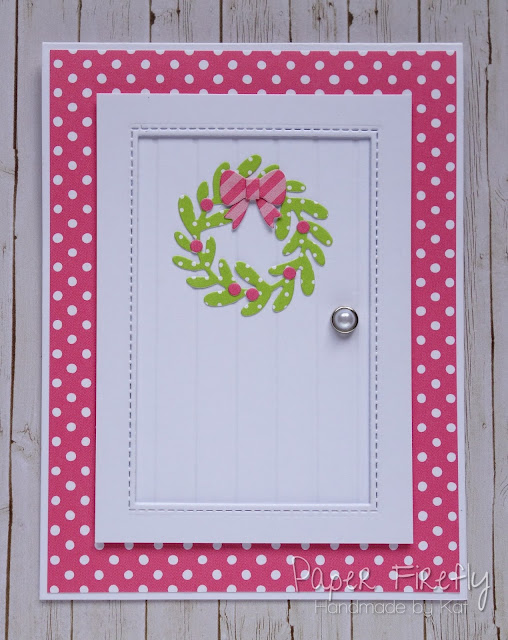
So, I have a few new bits to play with and started with the super cute mini wreath, and since I don't have a die cut door, I made my own with a stitched rectangle aperture die and score board :-)

Contemporary Christmas card with door and mini wreath, using Mini Wreath by Lawn Fawn

This little die cuts the leaves all in one piece, and you could layer several of these up if you wanted a fuller wreath.  The bow is sooooo cute and the teeny berries are sweet...but a little fiddly to place!

Contemporary Christmas card with door and mini wreath, using Mini Wreath by Lawn Fawn

I also got the larger wreath and have used the new Knit Picky papers for this card.

Christmas card with layered wreath around text stamp, using Large Wreath and Knit Picky papers by Lawn Fawn

This wreath is a 'build it yourself' one and of course, that means the foliage will be useful all year round.  I cut some of the foliage to shorter lengths to add variation to the wreath.

I can see myself using that bow die a lot too, not just for Christmas, and it comes with another die option for the tails where they are in line with the loops of the bow.

Christmas card with layered wreath around text stamp, using Large Wreath and Knit Picky papers by Lawn Fawn

If I've tempted you with any of the lovely supplies I've used then you can go straight to the individual products via the links at the end of my post or just pop over to Dies to Die For and have a little browse around!

Thanks for visiting and I really appreciate any comments that you leave,


Thursday 7 September 2017

Creating a scene!

Hello lovely people,

So, did any of you get your hands on the lovely new Christmas images from LOTV?!

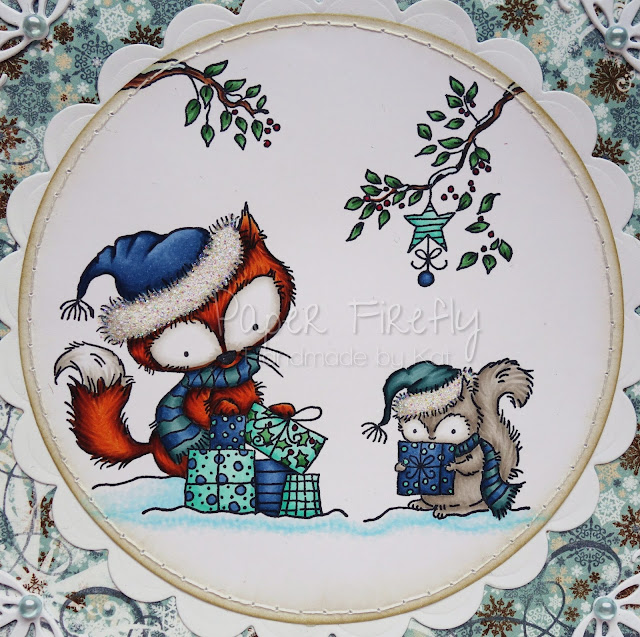
In my last post I said that I was going to have a play with creating a scene using the Woodland Scene collection and they really are perfect for doing this.

Woodland scene Christmas card with fox and squirrel, using LOTV stamps

I also got to colour up the cute fox and squirrel which I hadn't previously used :-)

Check out how the stamps have all the animals in size proportion to each other, which is brilliant if you want to use them together.

Woodland scene Christmas card with fox and squirrel, using LOTV stamps

I thought you might like to see how I created this scene using the rubber stamps, especially because they are not clear so you can't see where you are placing them.

I had decided on a circular scene so I cut a circle from scrap to the size I wanted then placed this underneath the top section of my MISTI (other stamp positioning tools are available!) and built up the scene I wanted using four different stamps.

I just put glue stick on the back of my LOTV stamps to stick them to the MISTI (or stamping block if I'm using one of those instead) as this is easily washed off with warm water afterwards.

So, you can see in this photo how I was able to position the stamps as desired, then I inked and stamped them all in one go...and yes, they all came out perfectly with just one single inking and stamping :-)

Positioning multiple stamps to create a scene using the MISTI

This turned out as quite a large scene so it really didn't need much in the way of detailing and I already had the paper picked out because I almost always choose my paper before I colour so I can co-ordinate everything!

Woodland scene Christmas card with fox and squirrel, using LOTV stamps

Thanks for visiting and I really appreciate any comments that you leave,


Lovely things I've used;
Woodland scenes collection rubber stamps by LOTV
Snowfall 6x6 paper pad by Bo Bunny
Turtle Doves die set by Sue Wilson for Creative Expressions (for the corner die cuts)
Circle die and Scalloped circle die by Tonic Studios

Copic colours;
Fox: E97, E99, E57
Squirrel / fox tail: W1, W2, W3, W4
Blue sections: B34, B95, B97
Dark teal: BG72, BG75
Light teal sections: BG11, BG23
Wood: E23, E25, E47
Leaves: YG45, G46
Berries: R46, R39
Snow: B0000, B000, B00

Monday 4 September 2017

LOTV: Christmas woodland scenes

Hello lovely people,

It's release day at LOTV so from midday you can get your hands on a huge range of stunning new Christmas images, available as rubber or digi stamps, or simply print sheets.

So I have my final Design Team creation for you, or should I say creations because I got carried away and ended up making a trio of cards!

I have used the Woodland Scenes collection and I've teamed them up with some of the newly released digi papers.

I think a lot of people are delighted to see the beautiful LOTV papers back in digi format, and the Kraft ones were always popular...well, they are so stylish!

This first card is 12.5cm square and uses one of the robins from the collection...

Cute Christmas card using Woodland scenes robin stamp by LOTV

I've used my stitched dies together to create the circular aperture within the square.  I just lay the square and circle dies down, measure to make sure the gap around the circle is even on all sides and tape them together so I can run them through my die cutting machine as one piece.

This is the other robin in the collection...

Cute Christmas card using Woodland scenes robin stamp by LOTV

I have used the digi stamps for my cards, but have printed them at the rubber stamp size so you can see what size they are.

For my last card, the image is a little bigger so I adapted the design slightly to make a 11.5 x 15cm card and added a sentiment on this one.

The new sentiment stamps are fabulous but I have to say that the sentiment tags are ones I go back to time and again, so if you don't have these I highly recommend them....sorry, I know I'm enabling again - lol!

Cute Christmas card using Woodland scenes owl stamp by LOTV

I haven't even shown you the gorgeous little fox and squirrel also included in this set!

I have now got the rubber versions of these so am looking forward to using some of them together to create a scene...how cute will that be?!

I know I could create a scene by merging the digi images too, but it takes me a while and I just prefer to do it with the rubber stamps!

Thanks for visiting and I really appreciate any comments that you leave,


Copic colours;
Robins / outer edge of owl: E23, E25, E47
Face & tummy of owl: E30, E31, E33
Wood: E30, E35, E55
Leaves: YG61, YG63
Snow: B0000, B000
Red details: R24, R27, R39
Green details: YG61, YG63, YG67


Sunday 3 September 2017

LOTV: Fairy Post

Hello lovely people,

I'm back as promised with another sneak peek of one of the brand new LOTV Christmas images, and it's release day tomorrow!

Yesterday I had a very traditional feeling Christmas card but today is a totally different kettle of fish with bright colours and a more modern feel.

Colourful Christmas card using Fairy Post stamp by LOTV

These little fairies were probably the first image I wanted to colour from this release...adorable doesn't even begin to cover it!

Colourful Christmas card using Fairy Post stamp by LOTV

Again, I've opted for a simple design because that image really needs to take centre stage, but I had just the perfect little embellishment in the form of the letters from an MFT mailbox die set...too cute!

The sentiment is from the recently released Snowflakes and Christmas Trees LOTV set which contains several cute sentiments which are perfectly sized for fishtails and you know I love a fishtail banner, right?!

Colourful Christmas card using Fairy Post stamp by LOTV

That's not the end of it because there are just so many images in this release that I wanted to play with so I'll have yet more to show you tomorrow on release day :-)

Thanks for visiting and I really appreciate any comments that you leave,


Lovely things I've used;
Fairy Post digi stamp by LOTV
Snowflakes and Christmas Trees by LOTV
Merry and Bright 6x6 paper pad by Carta Bella
Large Frilly Frames #10 by Go Kreate
Circle dies by Tonic Studios
Inside and out stitched rectangle STAX by My Favorite Things
Mailbox Dienamics by My Favorite Things
Fishtail banner from one of the MFT Blueprints...not sure which - lol!
Crystal Glamour Dust

Copic colours;
Skin: E000, E00, E21, E11, E04
Hair: E53, E57, E59
All red sections: R35, R37, R39
All green sections: YG23, YG25, YG17
All aqua sections: BG11, BG32, BG34
Fairy wings: BG10, BG11, BG32
Shoes: T5, T6, T7
Letters: YR30, E40
Fluffy trims / pom poms: W00, T0, T1, T2
Postbox base: T4, T5, T6, T7
Blobs on top of mushroom postbox: YR30, E40, E41, E42
Ground: B0000, B000, B00, B41

Saturday 2 September 2017

LOTV: Christmas bird house

Hello lovely people,

It's time for MORE amazing Christmas designs from LOTV and I feel unbelievably lucky that as part of the DT I get to play with them all...and maybe tempt you all a little!

This release has so many different styles of image so I think I am safe to say there is something for everyone.  I am absolutely loving all of them so have made quite few samples, and I'm starting with this beautiful Christmas bird house...

Double framed Christmas card using Christmas bird house stamp by LOTV

This image appealed to me because I really enjoy colouring foliage and wood...for some odd reason - lol!

Oh, and it's just adorable too!

Double framed Christmas card using Christmas bird house stamp by LOTV

With such a gorgeous detailed design I knew I wanted to keep the card design fairly simple so I created a double frame design, with the inner green frame raised up on 1mm foam pads and then the red spotty frame raised up another 1mm on foam pads.

The holly berries are Nuvo drops, which I dropped separately on a piece of acetate and allowed to dry before gluing to the card; this way the three berries stay nice and separate rather than merging into one as they would if I dropped them directly onto the card.

Double framed Christmas card using Christmas bird house stamp by LOTV

I will be back tomorrow with another of the new images in a completely different style, so until then, I hope you are enjoying your weekend :-)

Thanks for visiting and I really appreciate any comments that you leave,


Lovely things I've used;
Christmas Bird House digi stamp by LOTV
Jingle 6x6 paper pad by Lilybee Designs
Christmas circular sentiments by LOTV
Inside and out stitched square STAX by My Favorite Things
Turtle doves die set by Creative Expressions (for the holly corner)
Autumn red Nuvo crystal drops by Tonic Studios

Copic colours;
Wood: E30, E55, E35
Holly / stocking: YG95, YG97, YG99
Ivy / tendrils: YG91, YG93, YG95
Robins: E27, E47, E89
Hats / robin breasts / stocking / berries: R37, R39, R59
Stars / robin beaks: Y21, Y19
Hat trims / pom poms: W00, W1, W2


Friday 1 September 2017

A little mermaid

Hello lovely people,

Gosh, Friday seems to have come around fast again!

So, of course I have a Dies to Die For DT card for you and I finally got round to using another of my un-inked Stamping Bella stamps!

Handmade card using Tiny Townie Mermaid by Stamping Bella

I definitely feel like this some days...surely life is far easier as a mermaid?!

Handmade card using Tiny Townie Mermaid by Stamping Bella

I always love the look of looped twine for detail but ooooh, it is a nuisance to get it to stay stuck in place nicely...thank goodness for Cosmic Shimmer glue!

Handmade card using Tiny Townie Mermaid by Stamping Bella

If I've tempted you with any of the lovely supplies I've used then you can go straight to the individual products via the links at the end of my post or just pop over to Dies to Die For and have a little browse around!

Thanks for visiting and I really appreciate any comments that you leave,


Copic colours;
Skin: E000, E00, E21, E11, E04
Hair: E11, E15, E18
Ahem...I may have neglected to write the rest of the colours down...oops!

Lovely things I've used from Dies to Die For;
Tiny Townie Mermaid stamp set by Stamping Bella
Under the Sea Sentiment stamp set by Stamping Bella
Stitched oval scallop edge frames by My Favorite Things

Other ingredients;
Treasures of the Sea 12x12" papers by Pion Design
Leafy branch 5 die by Moda Scrap for Elizabeth Craft
Beaded swirl flourish die by Sue Wilson for Creative Expressions
Twine, pearls, charm from stash